Perfectly Random
machine learning, probability, and programmingSetup a Spark cluster on AWS EMR
AWS provides an easy way to run a Spark cluster. Let’s use it to analyze the publicly available IRS 990 data from 2011 to present. This data is already available on S3 which makes it a good candidate to learn Spark. This medium post describes the IRS 990 dataset. This documentation shows you how to access this dataset on AWS S3. We will see more details of the dataset later.
Setup a Spark cluster
Caveats
I do not go over the details of setting up AWS EMR cluster. Interested readers can read the official AWS guide for details. Setting up an AWS EMR cluster requires some familiarity with AWS concepts such as EC2, ssh keys, VPC subnets, and security groups. I do not cover these details in this post either. Using AWS will probably require you to setup a payment method (such as a credit card) and may cost you some money. I advise you to keep an eye on the cost. If this is your first time using a cloud computing platform (such as AWS or GCP), I recommend you first try out setting up an EC2 instance before you move on to setup an EMR cluster. Some steps such as setting up billing and setting up an EC2 key pair are common to both EC2 and EMR.
We will use Python, Jupyter notebook, and pyspark to analyze the data. AWS provides an already configured JupyterHub installation but we will not use the AWS-provided installation. Instead, we will install our own jupyter package on the cluster and use that. This is because the AWS-provided JupyterHub installation runs within a docker container and deprives the end user (which is you and me) of many python and jupyter benefits. It also adds another layer of complexity to an already complicated Spark cluster setup. The AWS-provided JupyterHub installation does provide us with some features that we don’t really need at this time. The increased complexity in the AWS-provided installation makes it difficult to install and use python packages (such as pandas and numpy). Finally, installing our own jupyter package is a good way to learn how to setup some tools for yourself, which is always a good thing for a data scientist.
Launch EMR cluster
We will use advanced options to launch the EMR cluster.
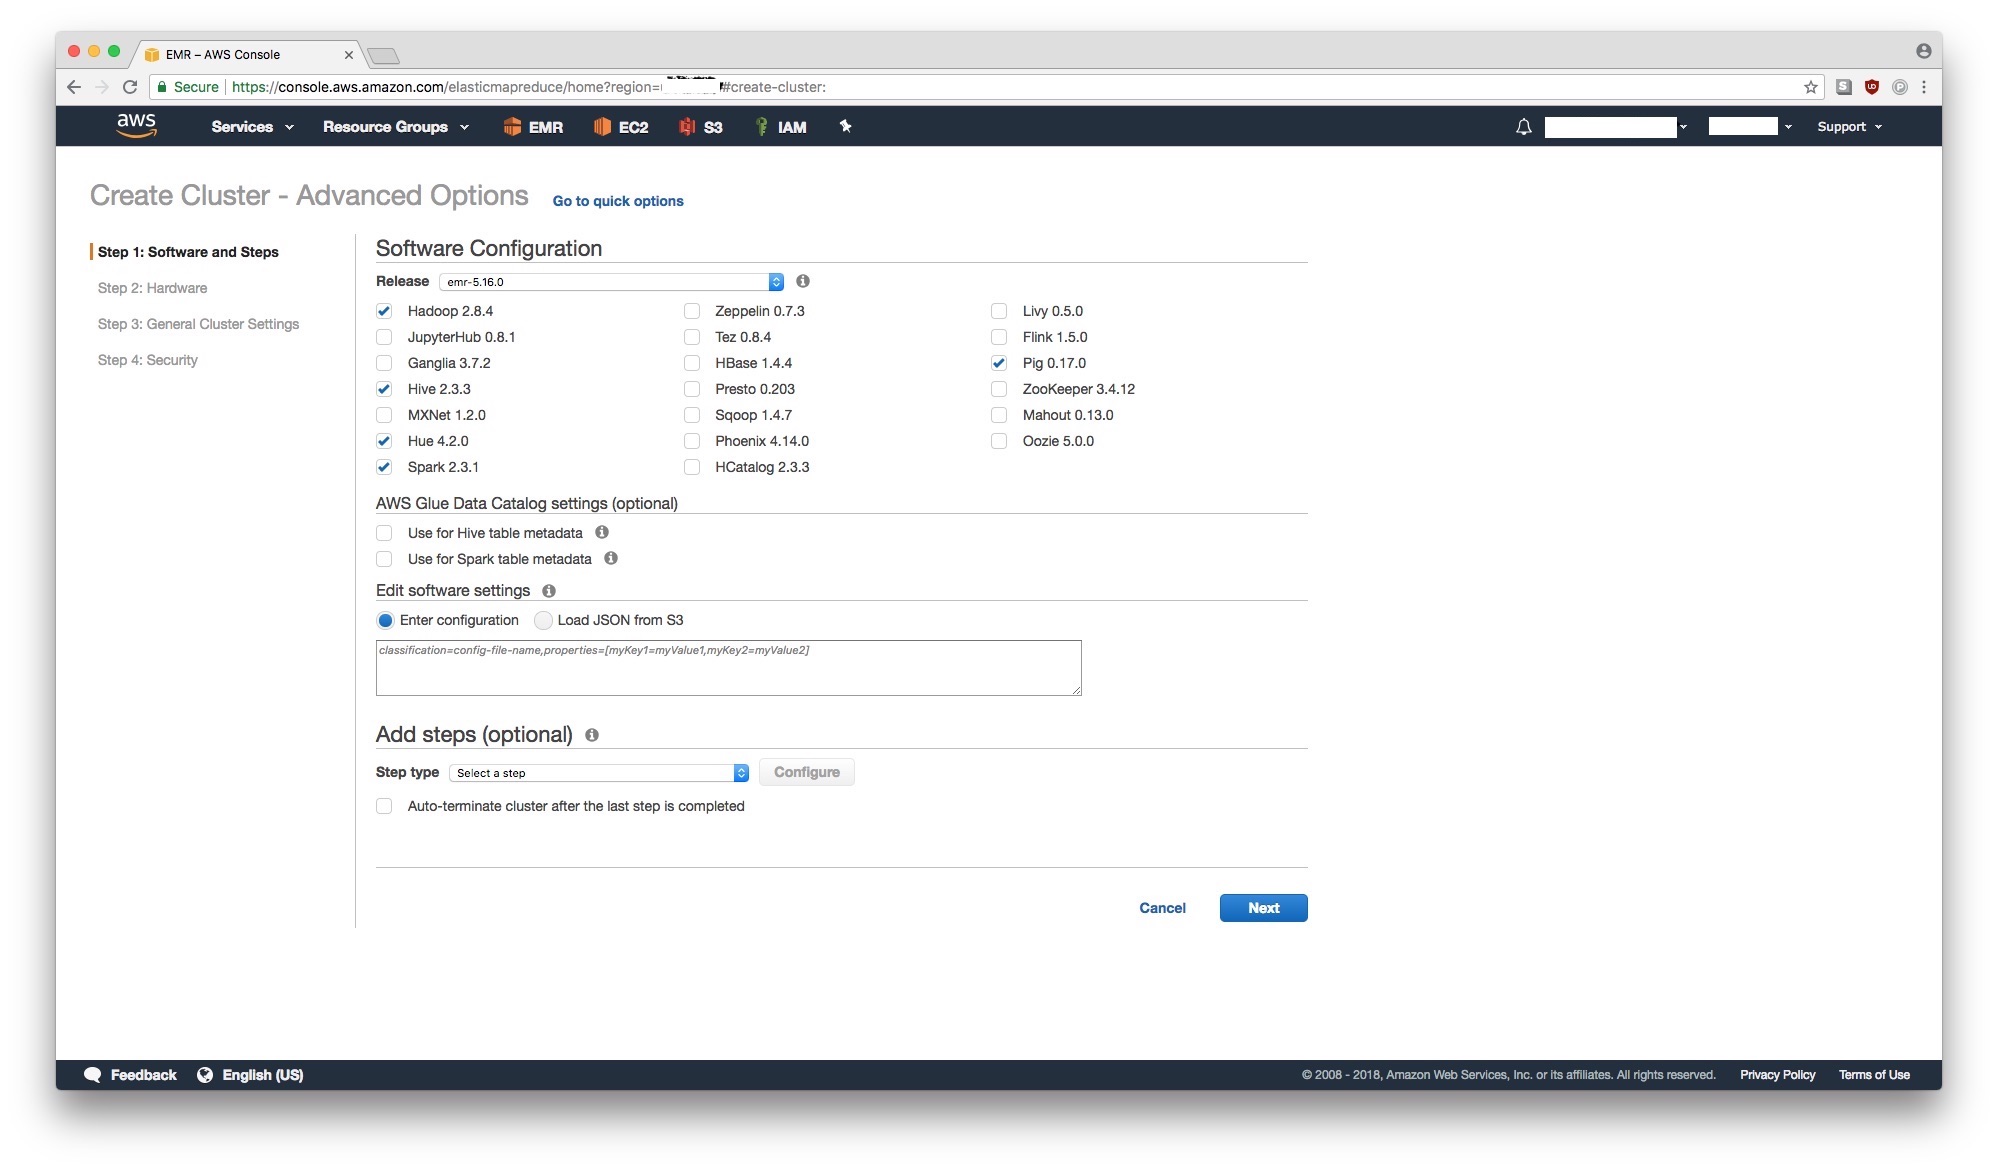
Step 1: Software and Steps
Launch an EMR cluster with a software configuration shown below in the picture. Ensure that Hadoop and Spark are checked. If this is your first time setting up an EMR cluster go ahead and check Hadoop, Zepplein, Livy, JupyterHub, Pig, Hive, Hue, and Spark. Enabling JupyterHub and Zeppelin options will provide a read-to-use albeit clunky jupyter notebook (as described above in Caveats) but it won’t prevent us from what we are trying to do.
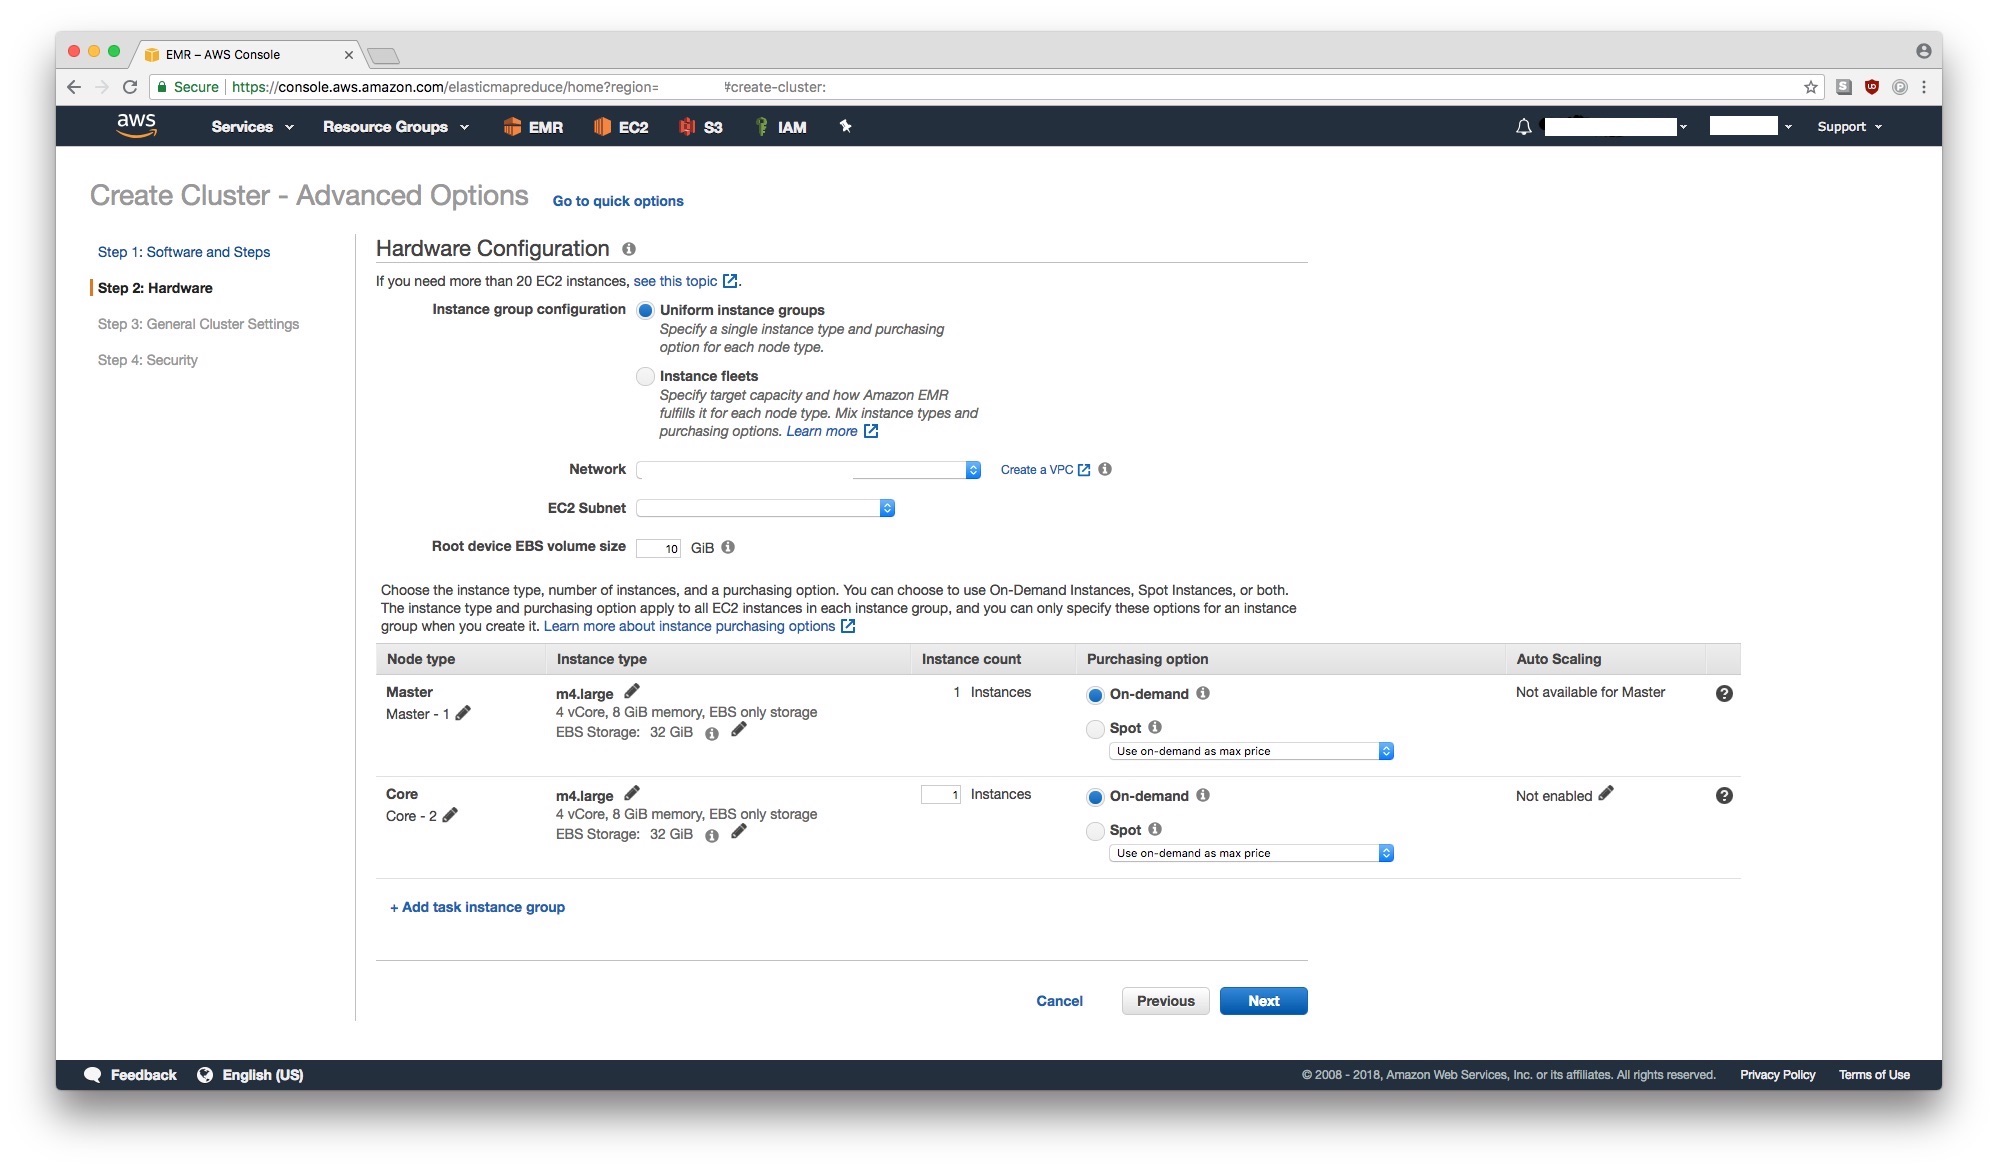
Step 2: Hardware
You can choose any hardware you’d like. More powerful instances cost more money so decide what’s reasonable for you. If this is your first time, stay with the default hardware options.
For now, we will use one m4.large instance for the Master and one m4.large instance for Core.
We don’t use any task instances just yet because we can easily add those later.
We choose only one core instance for the same reason
– we can easily add more instances later.
One restriction is the instance type – you may not be able to change the instance types later, especially for the master node. Therefore, you may want to choose a more powerful instance type for the master node to begin with. Typically, an instance with 8 virtual cores and 16GB of memory is a good start for a master node. For Core instances, 4 virtual cores and 32 GB of memory or higher may be a good fit. Typically, more memory and more EBS storage is useful for worker nodes. If we need task instances, we can add them later as spot instances which can be significantly cheaper.
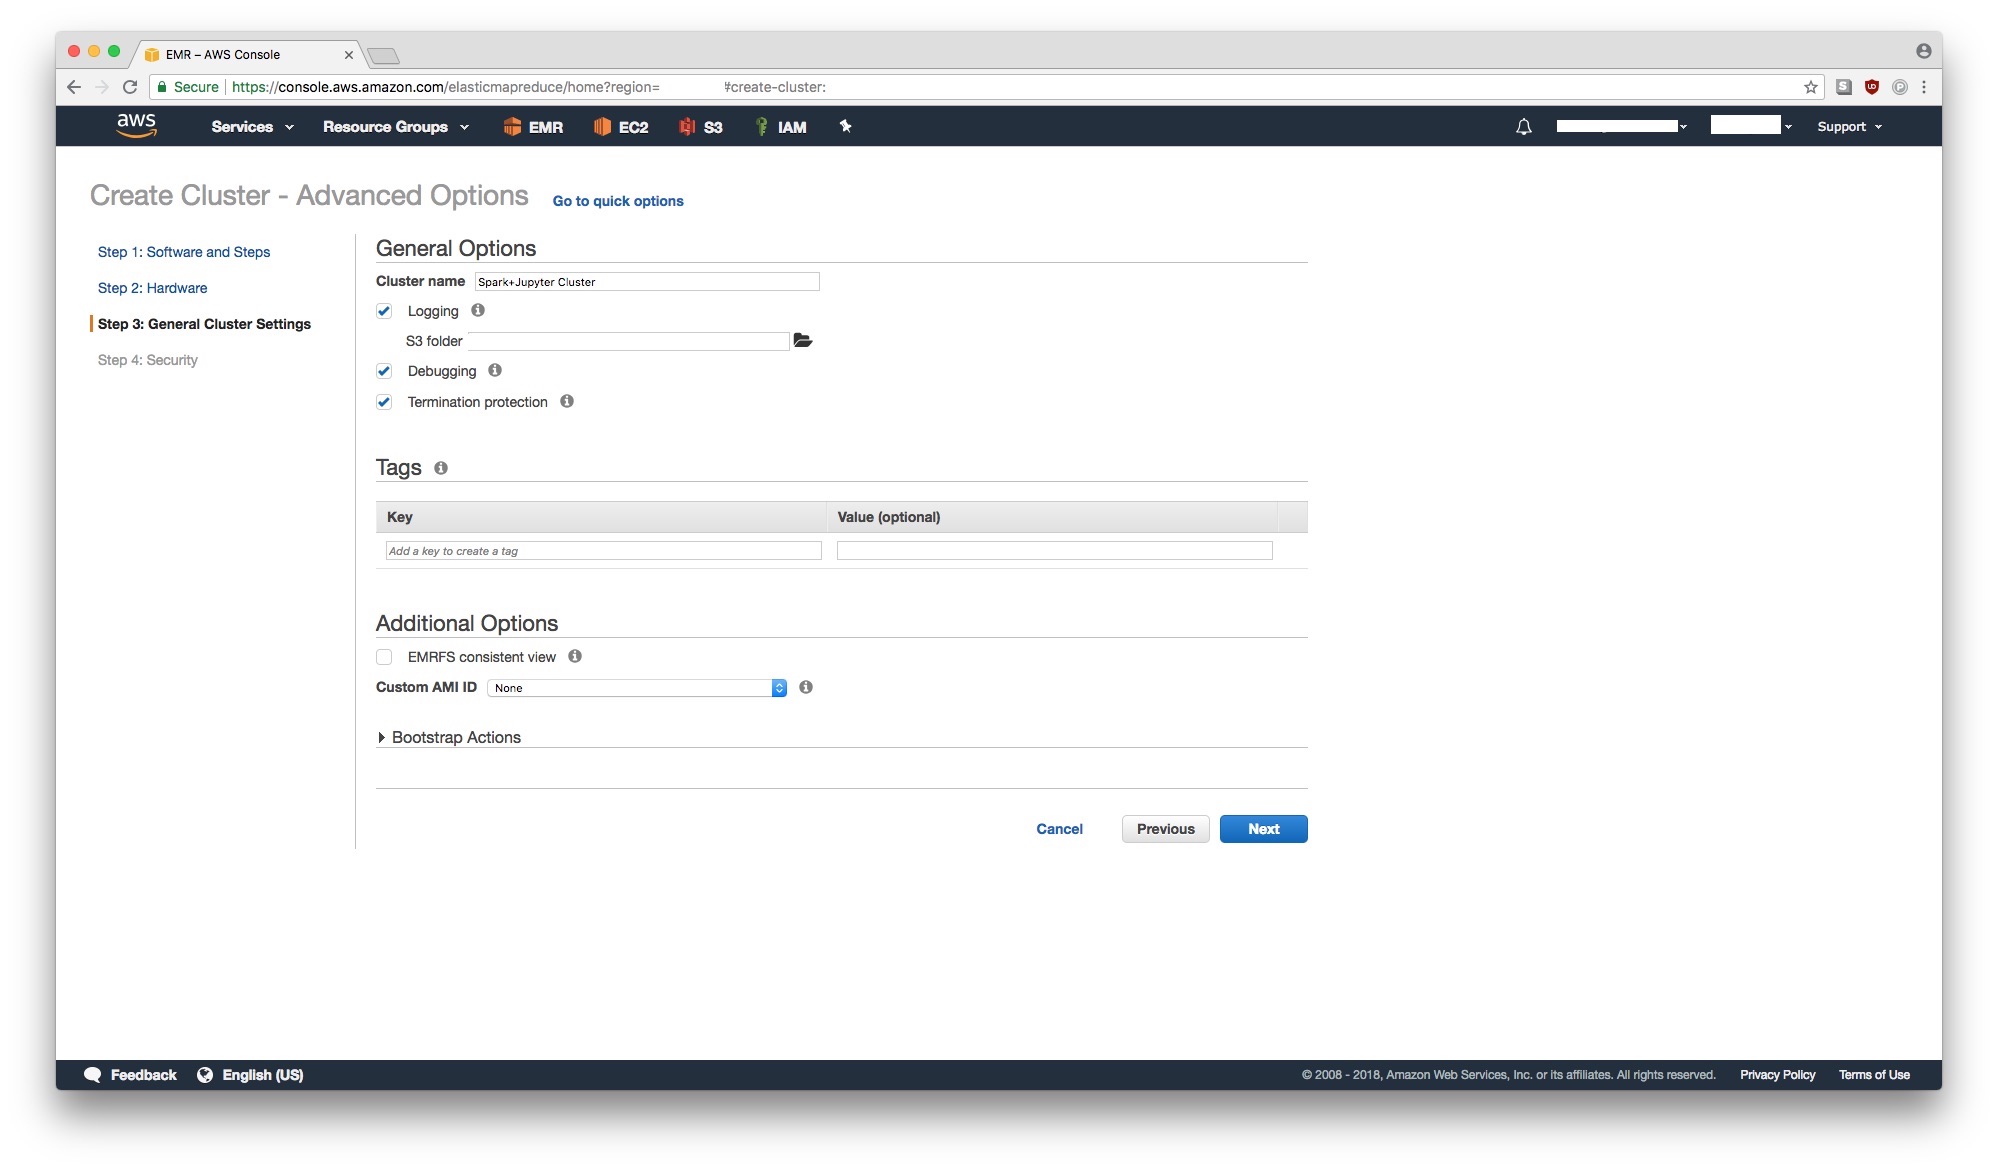
Step 3: General Cluster Settings
Let’s provide a name for our cluster. The name doesn’t have to be unique (even within one AWS account, you can have multiple EMR clusters with the same exact name). We enable logging to AWS S3 to a bucket of our choosing (for security reasons, it’s a good idea to have this bucket be private and encrypted). We don’t need to specify any bootstrap actions at this time.
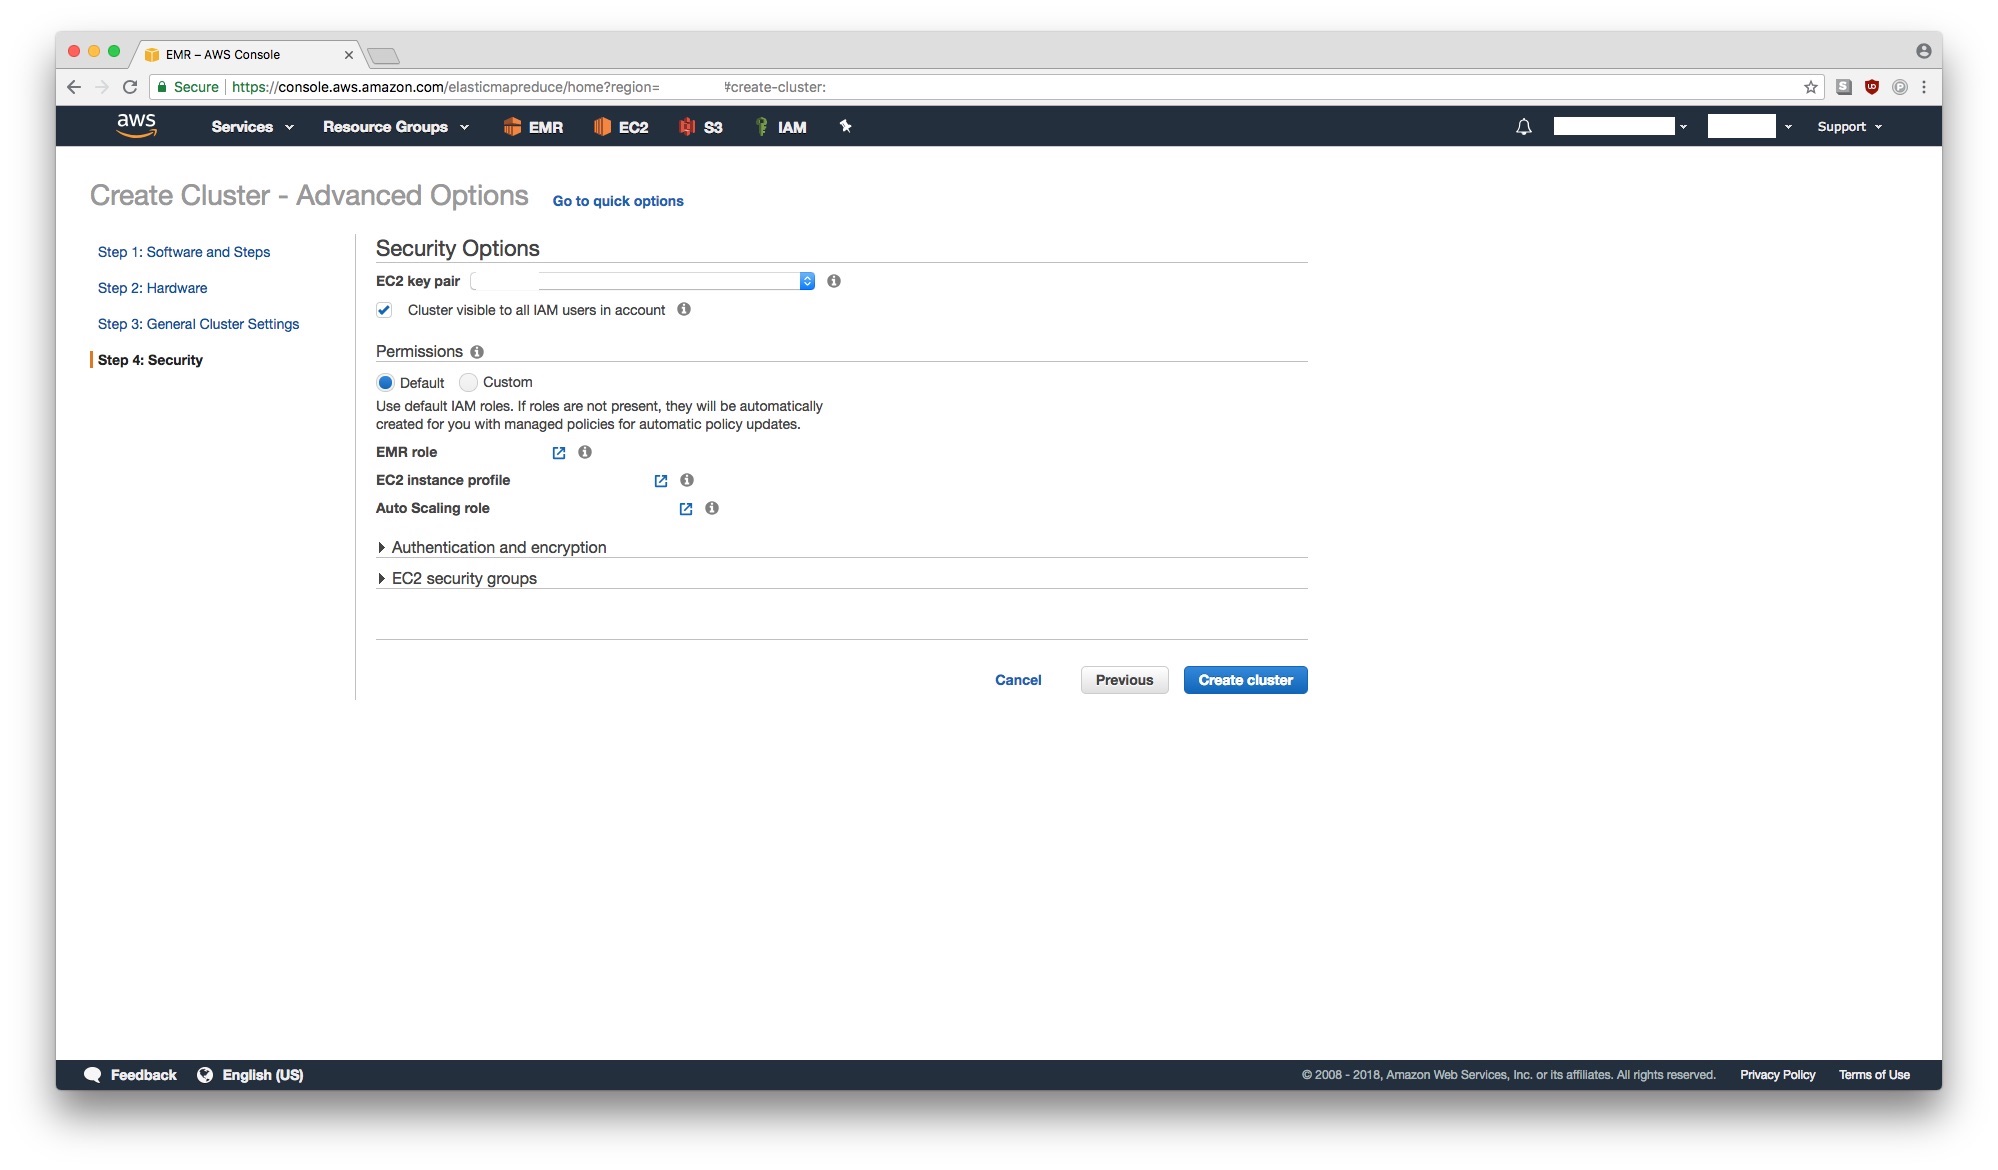
Step 4: Security
We use an already setup EC2 key pair. We will need to be able to ssh into the EMR cluster which means this step is necessary. You may find these instructions on how to setup an EC2 key pair useful. We use the default EC2 security groups for now. Security groups are important consideration because Spark requires that master node can talk to the worker nodes via password-less (using a private key) ssh. We need to make sure that the instances have the necessary ports open to allow ssh traffic between them. Ideally, you should open your EMR cluster just enough so that you can access it but any unauthorized person/program cannot. If you’re setting this cluster up for work, please consult your DevOps engineer or someone in-charge of security.
Launch
It might take 5-10 minutes after you click on Create Cluster button for your cluster to be
ready. When the cluster is ready, it should say Waiting, in green color.
Setup ssh into the EMR cluster
Create a new security group
While the cluster is launching, let’s create a new security group so that we can ssh into the master node of the EMR cluster. Note that you can use this security group for any EC2 instance including the EMR cluster we just launched.
- Go to EC2 homepage on AWS.
- Make sure you’re in the same region as the EMR cluster.
- Click on
NETWORK & SECURITY > Security Groupsin the left-hand-side menu. - Click on
Create Security Groupbutton. - Provide any
Security group name; we will useallow-ping-ssh. - Provide any
Description; we will use ‘Allows pinging and ssh’. - Use the same
VPCas the one you used for the EMR cluster. Typically, this is the default value. - Click on
Add Rulethree times and add rules to allow ICMP (pings) in v4, v6 and SSH from your own IP. See the screenshot below. - Click on
Createto create the security group.
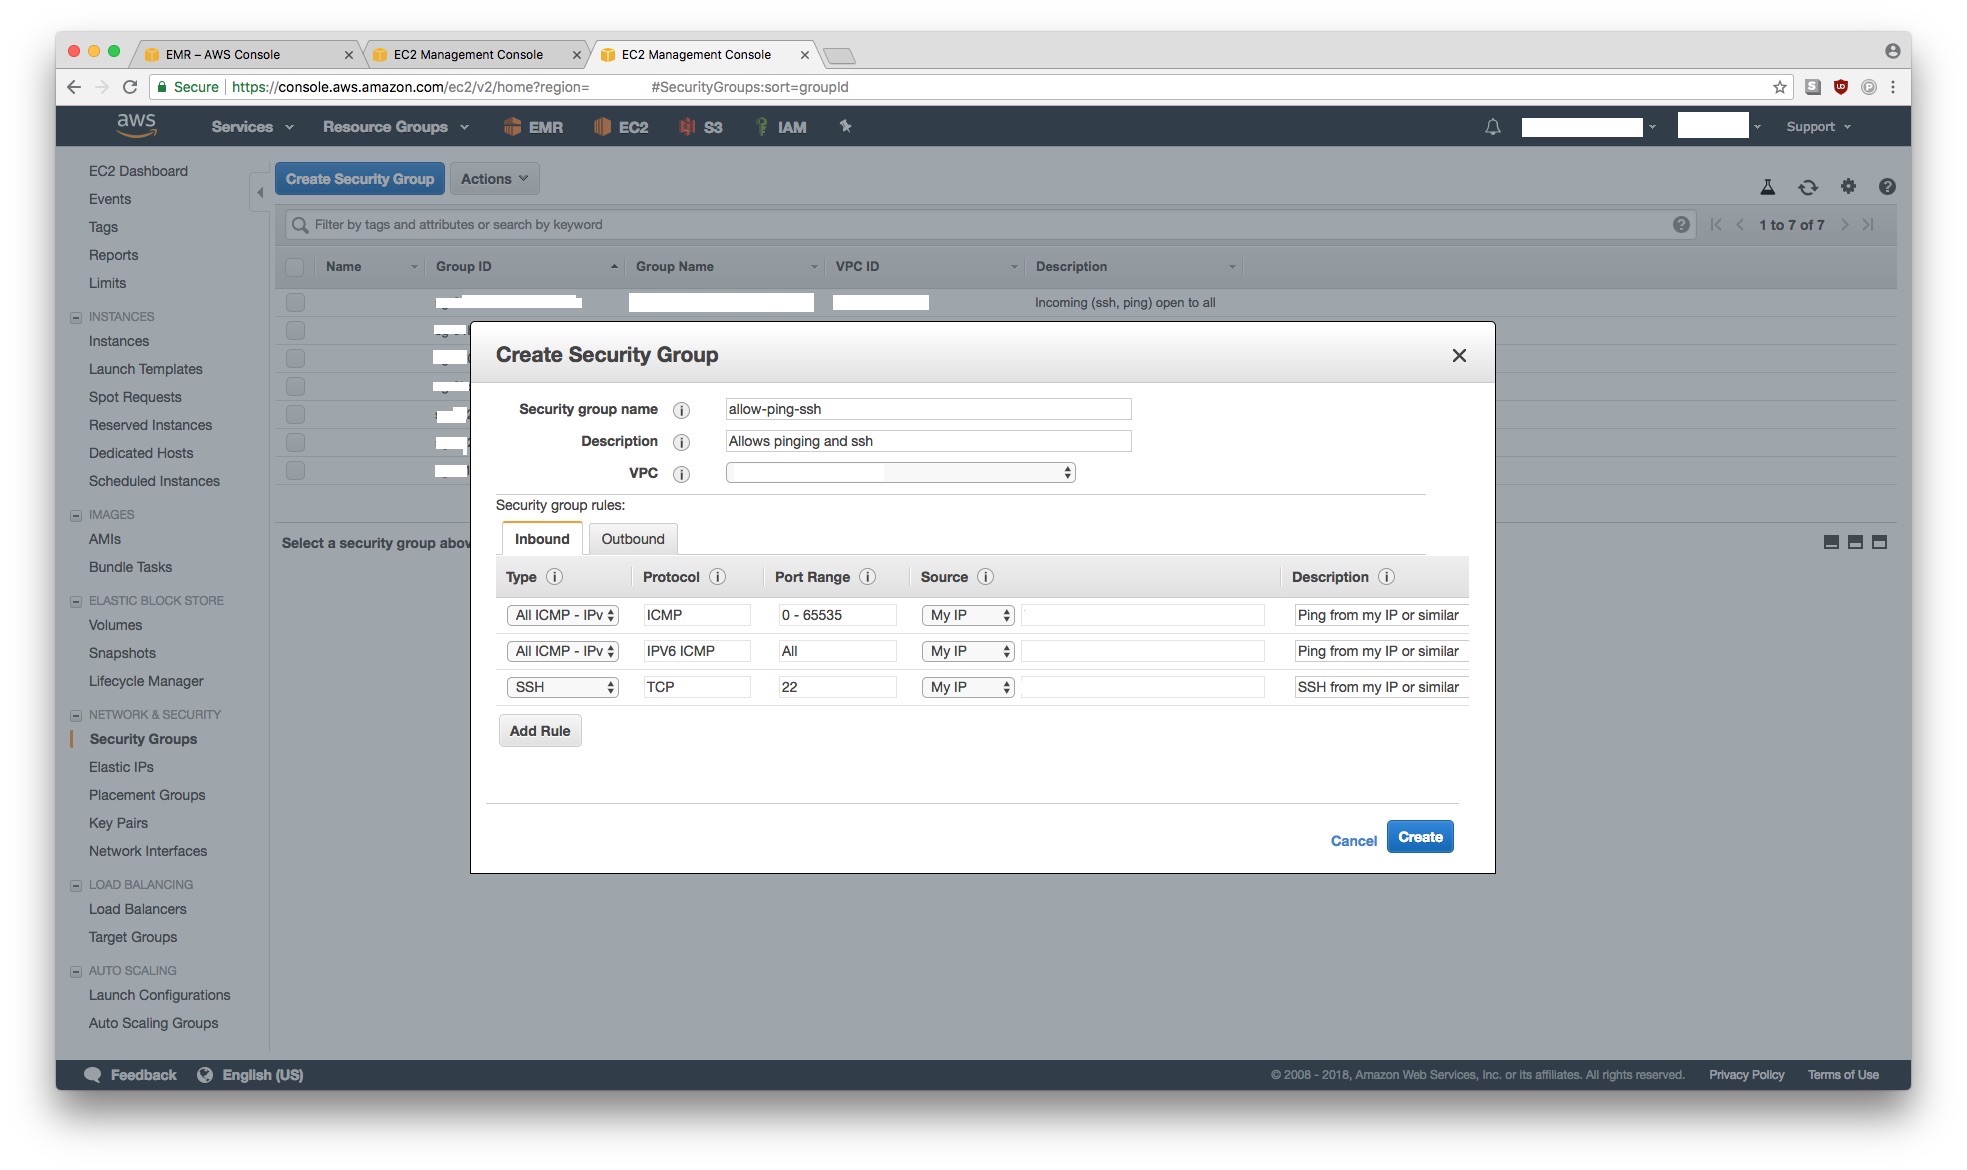
Caveat: This security group setting may not be sufficiently secure for your situation. As mentioned before, if you’re doing this for for work, please consult your DevOps engineer or someone in-charge of security.
Add security group to master node
We want to be able to ssh into the master node of the EMR cluster. To ssh, we want to allow TCP traffic on port 22 (default port for ssh) from our IP (or similar) going to the master node of the EMR cluster. We also allow pinging the master node from our IP address (this helps in debugging ssh failures).
- Go to EMR homepage on AWS.
- Find your EMR cluster and click on it. Tip: Ensure you’re on the same region as the one you launched your cluster in. Check the top right of the webpage for the name of the region.
- Once you’re on the cluster’s homepage, click on
Hardware. You should see your master and core instance(s) listed. - Click on the
IDof the master node. Typically, this is a link that looks like likeig-S0MESTR1NG. - Click on the
EC2 instance ID. Typically, this is a link that looks likei-0a1b2c3d4e5f. You should now only see only row showing your master EC2 instance. - Right-click on this row, click on
Networking > Change Security Groups. - Leave the already checked security group as-is. Check the
allow-ping-sshsecurity group that we created in the previous step.
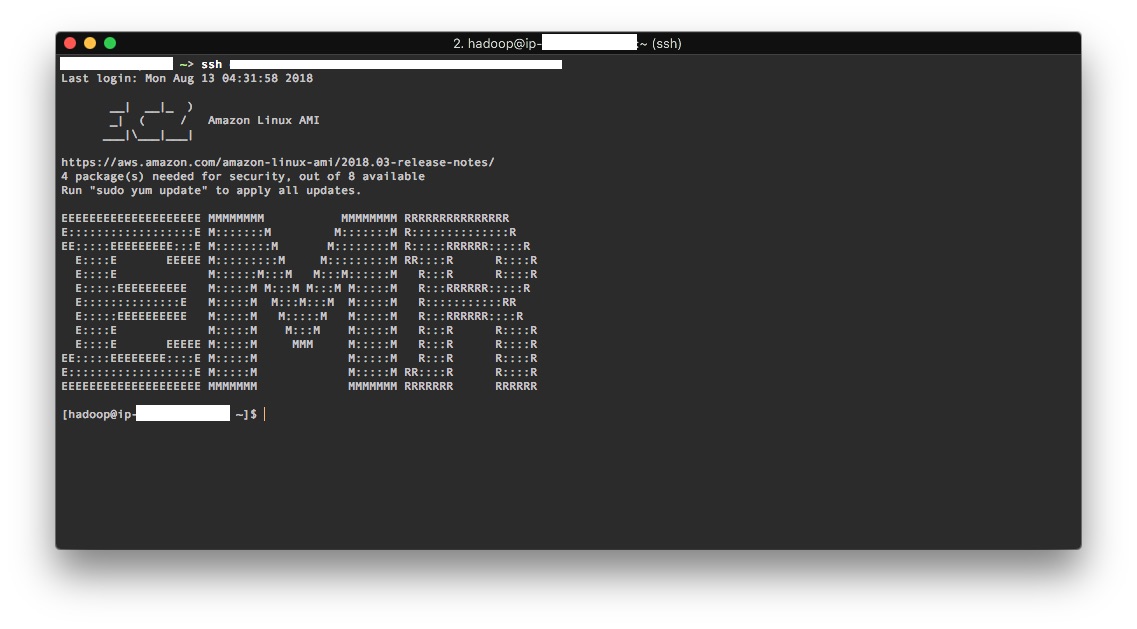
SSH into master node
We should be all set to ssh into our EMR cluster. By logging into the EMR cluster, we mean logging into the master node of the EMR cluster.
- Go to the cluster homepage.
- Ensure that the cluster is done provisioning and that you can
see
Waitingin a green color. - Click on the SSH link on the cluster’s homepage. This should tell you how to ssh into
your cluster. Typically, this requires running the
sshcommand on you local machine as shown below.
# On local machine
ssh -i ~/my-ec2-key-pair.pem hadoop@ec2-xxx-xxx-xxx-xxx.compute-1.amazonaws.com
Troubleshooting
This is how a successful ssh into the master node looks like.
If you cannot ssh into the master node, try pinging it first.
# On local machine
ping ec2-xxx-xxx-xxx-xxx.compute-1.amazonaws.com
If you can successfully ping the instance, then you’re halfway there. Try
using the verbose mode of ssh to better understand what’s preventing you from sshing into
the master node.
# On local machine
ssh -vv -i ~/my-ec2-key-pair.pem hadoop@ec2-xxx-xxx-xxx-xxx.compute-1.amazonaws.com
Finally, take a look at this AWS troubleshooting page which contains some really helpful videos to solve this exact issue.
You will need to ssh into the master node to perform the next steps in this post.
Get to know your EMR cluster
Let’s explore the installation first. This builds a general understanding of how things work, especially when you’re using a machine that someone else (in our case, AWS) setup for you. Note that your results might vary a little depending on specific versions of software packages being run on your instance.
User
Firstly, we see that we are logged in as the user hadoop.
# On EMR master node
[hadoop@ip-xxx-xxx-xxx-xxx ~]$ whoami
hadoop
[hadoop@ip-xxx-xxx-xxx-xxx ~]$ pwd
/home/hadoop
[hadoop@ip-xxx-xxx-xxx-xxx ~]$ echo $HOSTNAME
ip-xxx-xxx-xxx-xxx
[hadoop@ip-xxx-xxx-xxx-xxx ~]$ echo $SHELL
/bin/bash
Python
Since we want to use python, let’s see what python goodies are available and where they are
stored. It looks like python 2.7, python 3.4, and pip for python 2 are installed.
# On EMR master node
[hadoop@ip-xxx-xxx-xxx-xxx ~]$ which python
/usr/bin/python
[hadoop@ip-xxx-xxx-xxx-xxx ~]$ which python3
/usr/bin/python3
[hadoop@ip-xxx-xxx-xxx-xxx ~]$ python --version
Python 2.7.14
[hadoop@ip-xxx-xxx-xxx-xxx ~]$ python3 --version
Python 3.4.8
[hadoop@ip-xxx-xxx-xxx-xxx ~]$ which pip
/usr/bin/pip
[hadoop@ip-xxx-xxx-xxx-xxx ~]$ which pip3
/usr/bin/which: no pip3 in (/usr/local/bin:/bin:/usr/bin:/usr/local/sbin:/usr/sbin:/sbin:/opt/aws/bin)
[hadoop@ip-xxx-xxx-xxx-xxx ~]$ pip --version
pip 9.0.3 from /usr/lib/python2.7/dist-packages (python 2.7)
Let’s see what python 2 packages are installed. Note that numpy is installed but pandas
and matplotlib are not installed.
# On EMR master node
[hadoop@ip-xxx-xxx-xxx-xxx ~]$ pip freeze
aws-cfn-bootstrap==1.4
awscli==1.14.9
...
nltk==3.2
...
numpy==1.14.5
...
virtualenv==15.1.0
...
You are using pip version 9.0.3, however version 18.0 is available.
You should consider upgrading via the 'pip install --upgrade pip' command.
Let’s check the user-site and system-site for the installed python 2. It looks like
the user-site doesn’t exist yet which means all of the packages we saw above are installed
at the system site. We also get warning to upgrade pip but we won’t do that because pip
seems to be installed in /usr/lib which will require the use of sudo to upgrade.
Using sudo can mess up the system python installation.
# On EMR master node
[hadoop@ip-xxx-xxx-xxx-xxx ~]$ python -m site
sys.path = [
    '/home/hadoop',
    '/usr/lib/python27.zip',
    '/usr/lib64/python2.7',
    '/usr/lib64/python2.7/plat-linux2',
    '/usr/lib64/python2.7/lib-tk',
    '/usr/lib64/python2.7/lib-old',
    '/usr/lib64/python2.7/lib-dynload',
    '/usr/local/lib64/python2.7/site-packages',
    '/usr/local/lib/python2.7/site-packages',
    '/usr/lib64/python2.7/site-packages',
    '/usr/lib/python2.7/site-packages',
    '/usr/lib64/python2.7/dist-packages',
    '/usr/lib64/python2.7/dist-packages/PIL',
    '/usr/lib/python2.7/dist-packages',
]
USER_BASE: '/home/hadoop/.local' (doesn't exist)
USER_SITE: '/home/hadoop/.local/lib/python2.7/site-packages' (doesn't exist)
ENABLE_USER_SITE: True
# On EMR master node
[hadoop@ip-xxx-xxx-xxx-xxx ~]$ pip show numpy
Name: numpy
Version: 1.14.5
Summary: NumPy: array processing for numbers, strings, records, and objects.
Home-page: http://www.numpy.org
Author: Travis E. Oliphant et al.
Author-email: None
License: BSD
Location: /usr/local/lib64/python2.7/site-packages
Requires:
You are using pip version 9.0.3, however version 18.0 is available.
You should consider upgrading via the 'pip install --upgrade pip' command.
Spark
Let’s inspect the spark installation, starting with pyspark.
We see that pyspark is installed in /usr/bin and it’s simply a bash script that calls another
bash script /usr/lib/spark/bin/pyspark.
# On EMR master node
[hadoop@ip-xxx-xxx-xxx-xxx ~]$ which pyspark
/usr/bin/pyspark
[hadoop@ip-xxx-xxx-xxx-xxx ~]$ more /usr/bin/pyspark
#!/bin/bash

# Autodetect JAVA_HOME if not defined
. /usr/lib/bigtop-utils/bigtop-detect-javahome

exec /usr/lib/spark/bin/pyspark "$@"
# On EMR master node
[hadoop@ip-xxx-xxx-xxx-xxx ~]$ more /usr/lib/spark/bin/pyspark
#!/usr/bin/env bash
...
export PYSPARK_DRIVER_PYTHON
export PYSPARK_DRIVER_PYTHON_OPTS
exec "${SPARK_HOME}"/bin/spark-submit pyspark-shell-main --name "PySparkShell" "$@"
Let’s check out /usr/lib/spark. We see that /usr/lib/spark is SPARK_HOME – it
contains the spark installation. We can get to the spark config files
(/usr/lib/spark/conf) and work folder (/usr/lib/spark/work) from here.
# On EMR master node
[hadoop@ip-xxx-xxx-xxx-xxx ~]$ cd /usr/lib/spark/
[hadoop@ip-xxx-xxx-xxx-xxx spark]$ ls -l
total 112
drwxr-xr-x 2 root root  4096 Aug 13 04:04 bin
lrwxrwxrwx 1 root root    15 Aug 13 04:04 conf -> /etc/spark/conf
drwxr-xr-x 5 root root  4096 Aug 13 04:04 data
drwxr-xr-x 4 root root  4096 Aug 13 04:04 examples
drwxr-xr-x 3 root root  4096 Aug 13 04:05 external
drwxr-xr-x 2 root root 20480 Aug 13 04:05 jars
-rw-r--r-- 1 root root 18045 Jun 29 18:11 LICENSE
drwxr-xr-x 2 root root  4096 Aug 13 04:04 licenses
-rw-r--r-- 1 root root 24913 Jun 29 18:11 NOTICE
drwxr-xr-x 6 root root  4096 Aug 13 04:04 python
drwxr-xr-x 3 root root  4096 Aug 13 04:04 R
-rw-r--r-- 1 root root  3809 Jun 29 18:11 README.md
-rw-r--r-- 1 root root   753 Jun 29 18:11 RELEASE
drwxr-xr-x 2 root root  4096 Aug 13 04:04 sbin
lrwxrwxrwx 1 root root    19 Aug 13 04:04 work -> /var/run/spark/work
drwxr-xr-x 3 root root  4096 Aug 13 04:05 yarn
Note that pyspark is not installed by pip. Instead, pyspark is available within our
spark installation at /usr/lib/spark/python.
We won’t need to install pysaprk using pip; instead, we will modify
PYTHONPATH and use the pyspark installation at /usr/lib/spark/python.
# On EMR master node
[hadoop@ip-xxx-xxx-xxx-xxx python]$ pip show pyspark
You are using pip version 9.0.3, however version 18.0 is available.
You should consider upgrading via the 'pip install --upgrade pip' command.
Finally, let’s see if we already have spark master daemon running on our master node. It appears that we don’t have a spark master daemon running, which is expected.
# On EMR master node
[hadoop@ip-xxx-xxx-xxx-xxx python]$ ps aux | grep "spark"
hadoop    7416  0.0  0.0 110512  2100 pts/0    S+   05:33   0:00 grep --color=auto spark
spark    16036  0.2  2.6 3614692 213244 ?      Sl   04:09   0:11 /usr/lib/jvm/java-openjdk/bin/java -cp /usr/lib/spark/conf/:/usr/lib/spark/jars/*:/etc/hadoop/conf/ -XX:OnOutOfMemoryError=kill -9 %p -Xmx1g org.apache.spark.deploy.history.HistoryServer
Install Python packages
Let’s install jupyter and any other python package on the master node.
Unlike AWS-provided
JupyterHub installation,
here, we can easily install python packages (including jupyter) using a familiar process;
we don’t have to worry about docker instances.
Note that we never use sudo to install a python
package in these instructions. Using sudo is in general a bad idea, even on your local machines
(Linux and MacOS) because there are many system utilities that depend on system python and
using sudo updates your system-wide python installation. We always use
pip install --user <pkg-name> which installs python packages in the user-site while leaving
system python dependencies alone. This also makes for an easy cleanup if things don’t work out
because we can easily delete user-site files and folders.
# On EMR master node
pip install --user jupyter
pip install --user ipython
pip install --user pandas
pip install --user matplotlib
pip install --user seaborn
Note that in some cases you’ll want to install a python package (typically, as a dependency)
that is already installed in the system-site. It may be useful to re-install the package in the
user-site to avoid dependency errors. To do this, you can use -I option like this:
# On EMR master node
pip install --user -I --upgrade python-dateutil

# Tip: You may want to try this to avoid errors associated with cached files.
# This typically happens when you install a package for both python2 and python3.
# pip install --user -I --upgrade --no-cache-dir python-dateutil
Launch Jupyter Notebook
Setup ssh or mosh
In order to launch the jupyter notebook, we will need to ssh into the master node of the
Spark cluster. As mentioned previously, you can use regular ssh to do this
but you may encounter timeout issues when running code that takes a lot of time. Since Spark
code typically does take some time to run, timing out is a frequent problem.
We can alleviate (but not eliminate) some of these timeout problems with a few nifty tricks.
The first trick prevents ssh timeouts resulting from inactivity (broken pipe problems).
We will periodically send a null packet to the server (master node of the Spark cluster)
to keep the connection alive.
This StackExchange post
and this blog post
provide some more details.
In order to accomplish this, we will add the following entry to our
~/.ssh/config file. If you don’t have ~/.ssh/config file, you can create it; it’s a plain
text file. Please remember to change the HostName and the location of the IdentityFile
to your specific values.
# In your ~/.ssh/config file
Host emr
    HostName ec2-xxx-xxx-xxx-xxx.compute-y.amazonaws.com
    User hadoop
    IdentityFile ~/my-ec2-key-pair.pem
    IdentitiesOnly yes
    ServerAliveInterval 119
    ServerAliveCountMax 10
We are essentially asking our ssh client (local machine) to send a null packet
every 119 seconds and expect a response from the server. If the client doesn’t receive a
response from the server, it tries again up to a maximum of 10 times before giving up.
The second trick involves the use of mosh which is
specifically designed to deal with this situation. You will need to install mosh on both
client (local machine) and the server (master node of the EMR cluster) as well as
allow UDP traffic on ports 60000–61000. You can edit the
security group allow-ping-ssh, which we setup previously, to do this. If you’re doing this
at work, please make sure that opening up these UDP ports is allowed at your employer’s.
Once mosh is ready for use, you can simply use mosh instead of ssh.
You can use both of these tricks simultaneously – keep the configuration we setup in
~/.ssh/config and still use mosh. I recommend that you use both tricks because
mosh cannot be used to do port forwarding and we will have to use plain old ssh as well.
# On local machine

# If you setup the entry in ~/.ssh/config, then you can simply type
mosh emr

# If you didn't setup the entry in ~/.ssh/config, use the full command
mosh -i ~/my-ec2-key-pair.pem hadoop@ec2-xxx-xxx-xxx-xxx.compute-1.amazonaws.com
Launch using pyspark
We will launch jupyter notebook via pyspark. The following bash script can easily
launch it for you. Alternatively, if you prefer, you can type out these commands in the
terminal.
# Create a script titled "launch-jupyter.sh" with the following contents on EMR master node.

#! /usr/bin/env bash
export PYTHONPATH="/home/hadoop/.local/lib/python2.7/site-packages:$PYTHONPATH"
export PYSPARK_DRIVER_PYTHON=/home/hadoop/.local/bin/jupyter
export PYSPARK_DRIVER_PYTHON_OPTS='notebook --no-browser'
echo $PYTHONPATH
echo $PYSPARK_DRIVER_PYTHON
echo $PYSPARK_DRIVER_PYTHON_OPTS
pyspark
# On EMR master node
[hadoop@ip-xxx-xxx-xxx-xxx ~]$ chmod u+x launch-jupyter.sh
[hadoop@ip-xxx-xxx-xxx-xxx ~]$ ./launch-jupyter.sh
You should see a message like the one below printed in your terminal. The ssh terminal will continue to be responsive and will print useful messages. You must keep it open as long as you want to use Jupyter notebook. See the “Exiting properly” section below for instructions on how to properly exit without losing data or accidentally killing the Spark cluster.
# Output of pyspark (on EMR master node)
...
Copy/paste this URL into your browser when you connect for the first time,
to login with a token:
    http://localhost:8888/?token=s0m3l0ngalphanumer1cstr1ng
...
We need to setup port forwarding before we can access the URL above. Make note of the
port number (8888 in this example) printed in the URL. This is the port at which
the jupyter notebook is served. We will need to use this port number to setup port forwarding.
Aside: ipython terminal instead of jupyter notebook
If you want to use ipython, then you don’t need to setup port forwarding.
You need to simply install ipython on the master node and then use different
environment variables. A benefit of using this method is that you can use ipython instead
of a regular python REPL. The ipython session will come with all the bells and whistles such
as syntax-highlighted output, tab-completion, and “?help”.
# On EMR master node
pip install --user ipython
# Create a script titled "launch-ipython.sh" with the following contents on EMR master node.

#! /usr/bin/env bash
export PYTHONPATH="/home/hadoop/.local/lib/python2.7/site-packages:$PYTHONPATH"
export PYSPARK_DRIVER_PYTHON=/home/hadoop/.local/bin/ipython
echo $PYTHONPATH
echo $PYSPARK_DRIVER_PYTHON
pyspark
# On EMR master node
[hadoop@ip-xxx-xxx-xxx-xxx ~]$ chmod u+x launch-ipython.sh
[hadoop@ip-xxx-xxx-xxx-xxx ~]$ ./launch-ipython.sh
Setup port forwarding
Remember that mosh cannot be used to setup port forwarding; we will have to use ssh to do that.
The following command will setup port forwarding as a background process.
See this blog post
for more details.
# On local machine

# If you setup the entry in ~/.ssh/config, then you can simply type
ssh -N -f -L 8888:localhost:8888 emr

# If you didn't setup the entry in ~/.ssh/config, use the full command
ssh -N -f -L 8888:localhost:8888 -i ~/my-ec2-key-pair.pem hadoop@ec2-xxx-xxx-xxx-xxx.compute-1.amazonaws.com
This sets up your local machine’s port 8888 to listen to the master node’s
port 8888. From the previous step, we know that the jupyter notebook is being served on port
8888 on the master node. Typically, the port 8888 is open on local machine but if it’s not
open, try another port. As a side note, the port 8888 does not conflict with the other default
EMR ports.
The AWS-provided JupyterHub notebook is
served
on port 9443.
If you don’t need to use jupyter notebook and want to use ipython or python terminal instead, then you don’t need to setup port forwarding.
Open jupyter notebook in a browser
Go to URL printed on the terminal screen previously. You should see a jupyter notebook homepage. The ssh terminal will print useful messages and you must keep it open.
Find your bearings
From the jupyter notebook homepage, click on “New” and open a terminal.
Type out these commands to check things out. Note that this terminal provides sudo-level
access to the master node of your EMR cluster. Be careful!
# On terminal within the jupyter browser tab
[hadoop@ip-xxx-xxx-xxx-xxx ~]$ whoami
hadoop
[hadoop@ip-xxx-xxx-xxx-xxx ~]$ pwd
/home/hadoop
[hadoop@ip-xxx-xxx-xxx-xxx ~]$ echo $HOSTNAME
ip-xxx-xxx-xxx-xxx
Test Spark variables
From the jupyter notebook homepage, click on “New” and open a “Python 2” notebook. The spark-related variables should already be available.
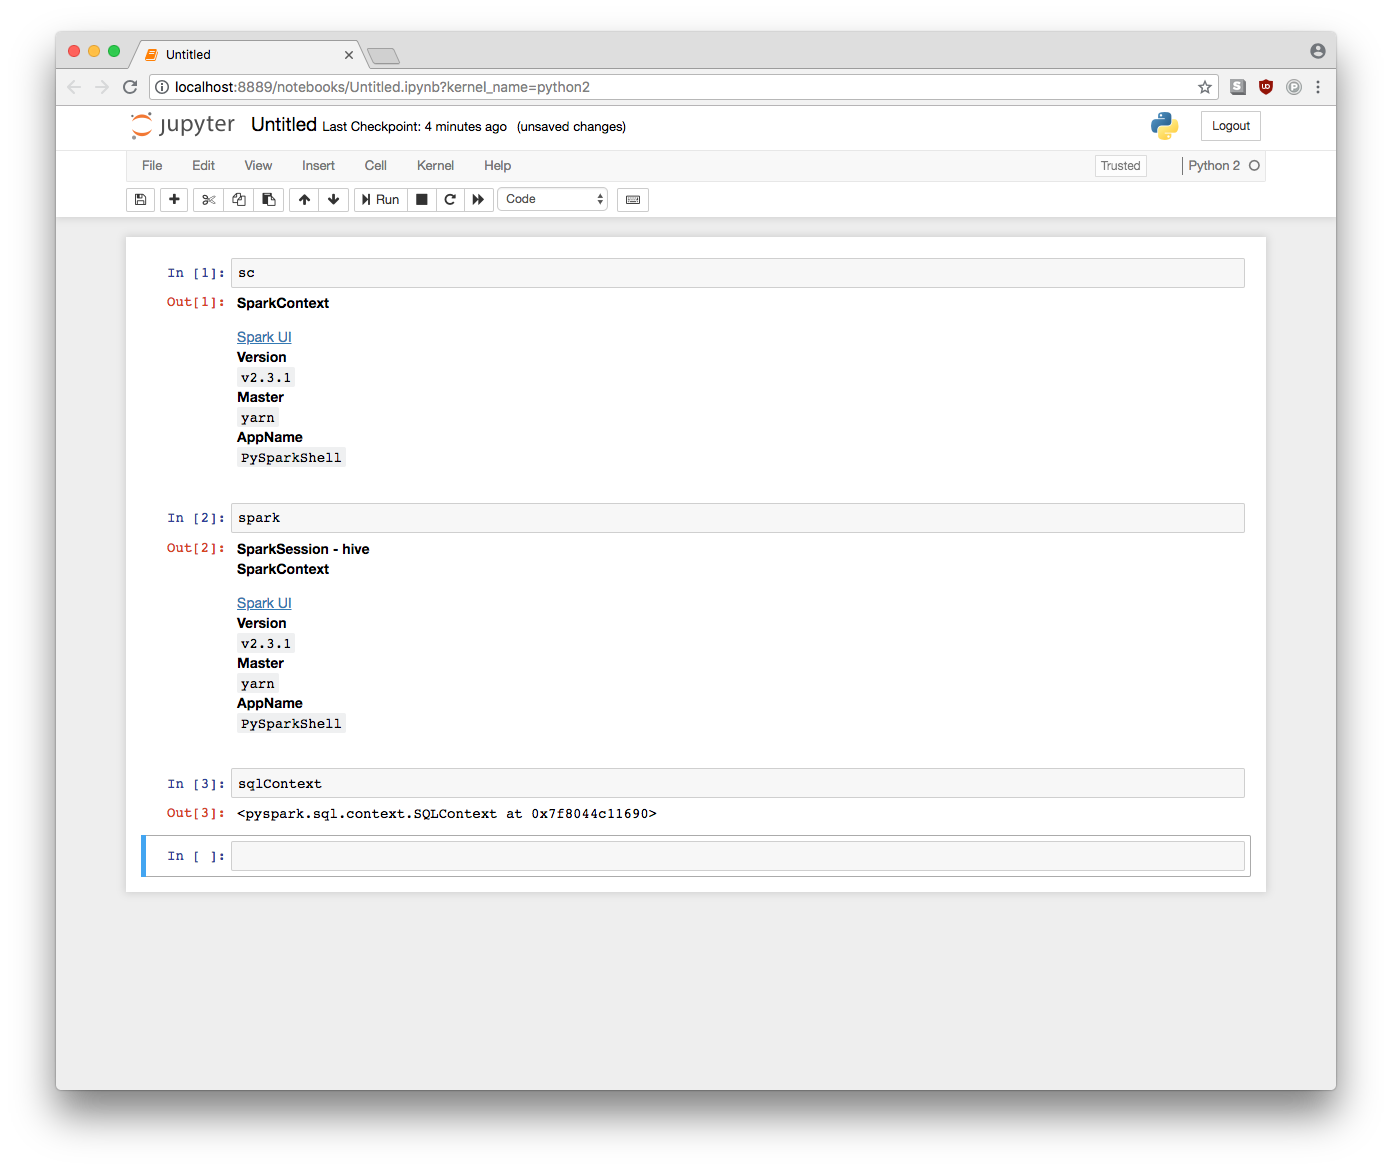
Import packages
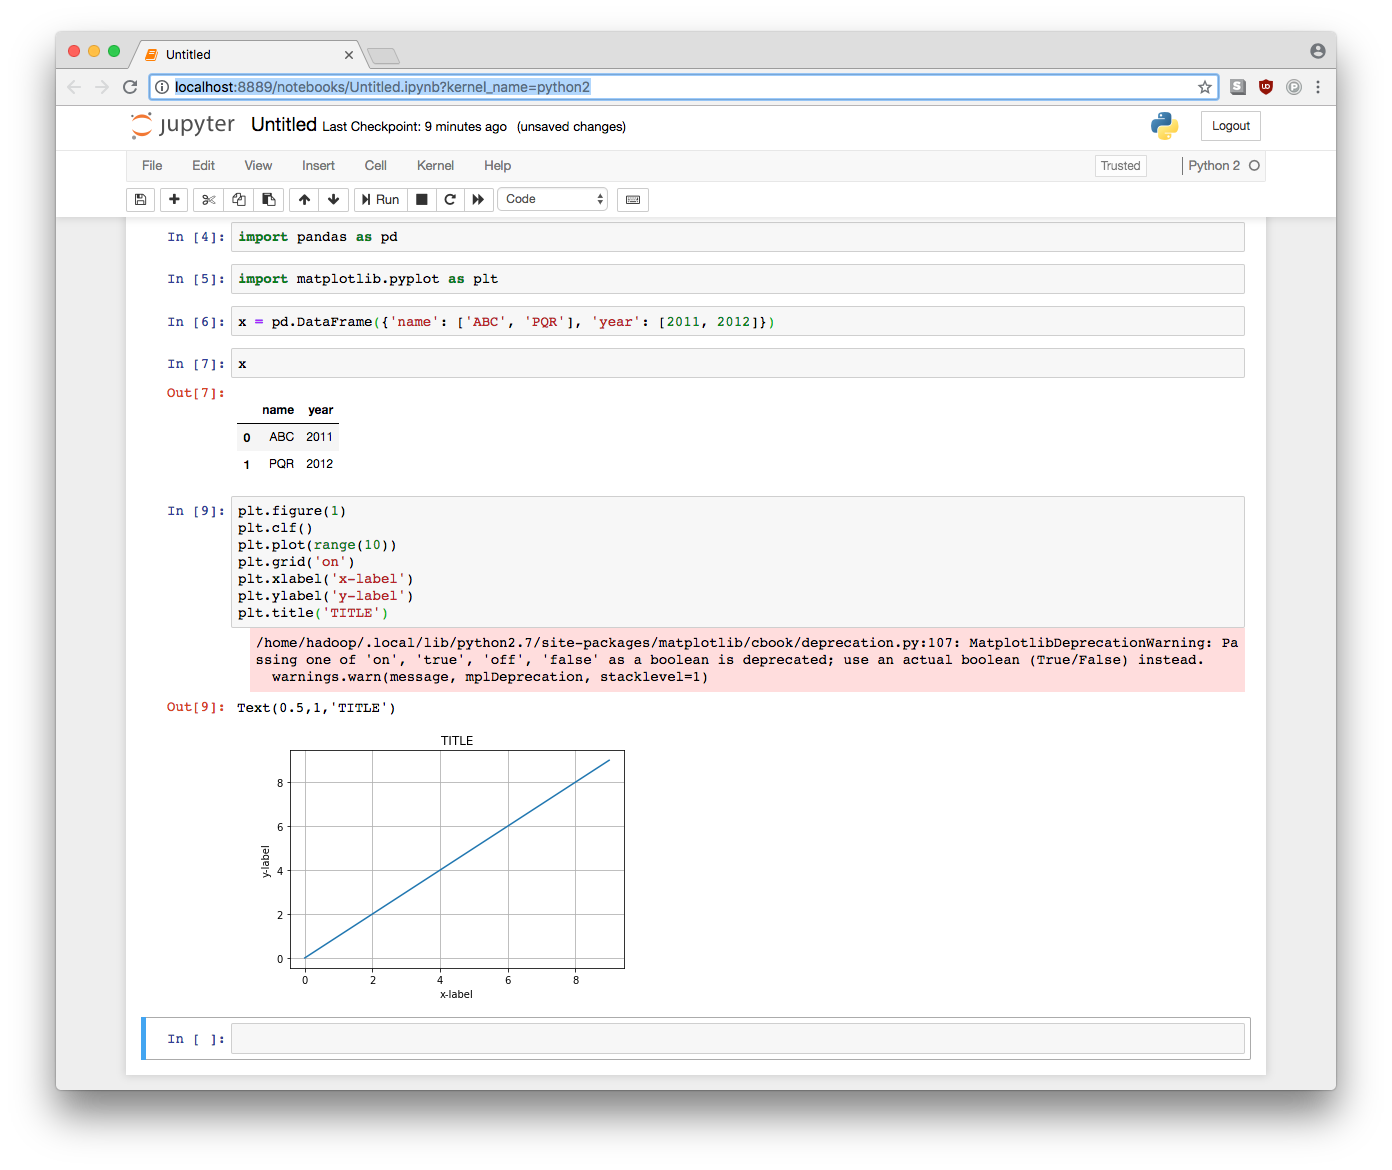
You can import any package that you installed previously. You install more packages in
using the instructions provided previously.
You may need to restart your ssh or jupyter session (in some cases)
before you can import newly installed packages. As an example, you can import pandas and
matplotlib.
Test jupyter features
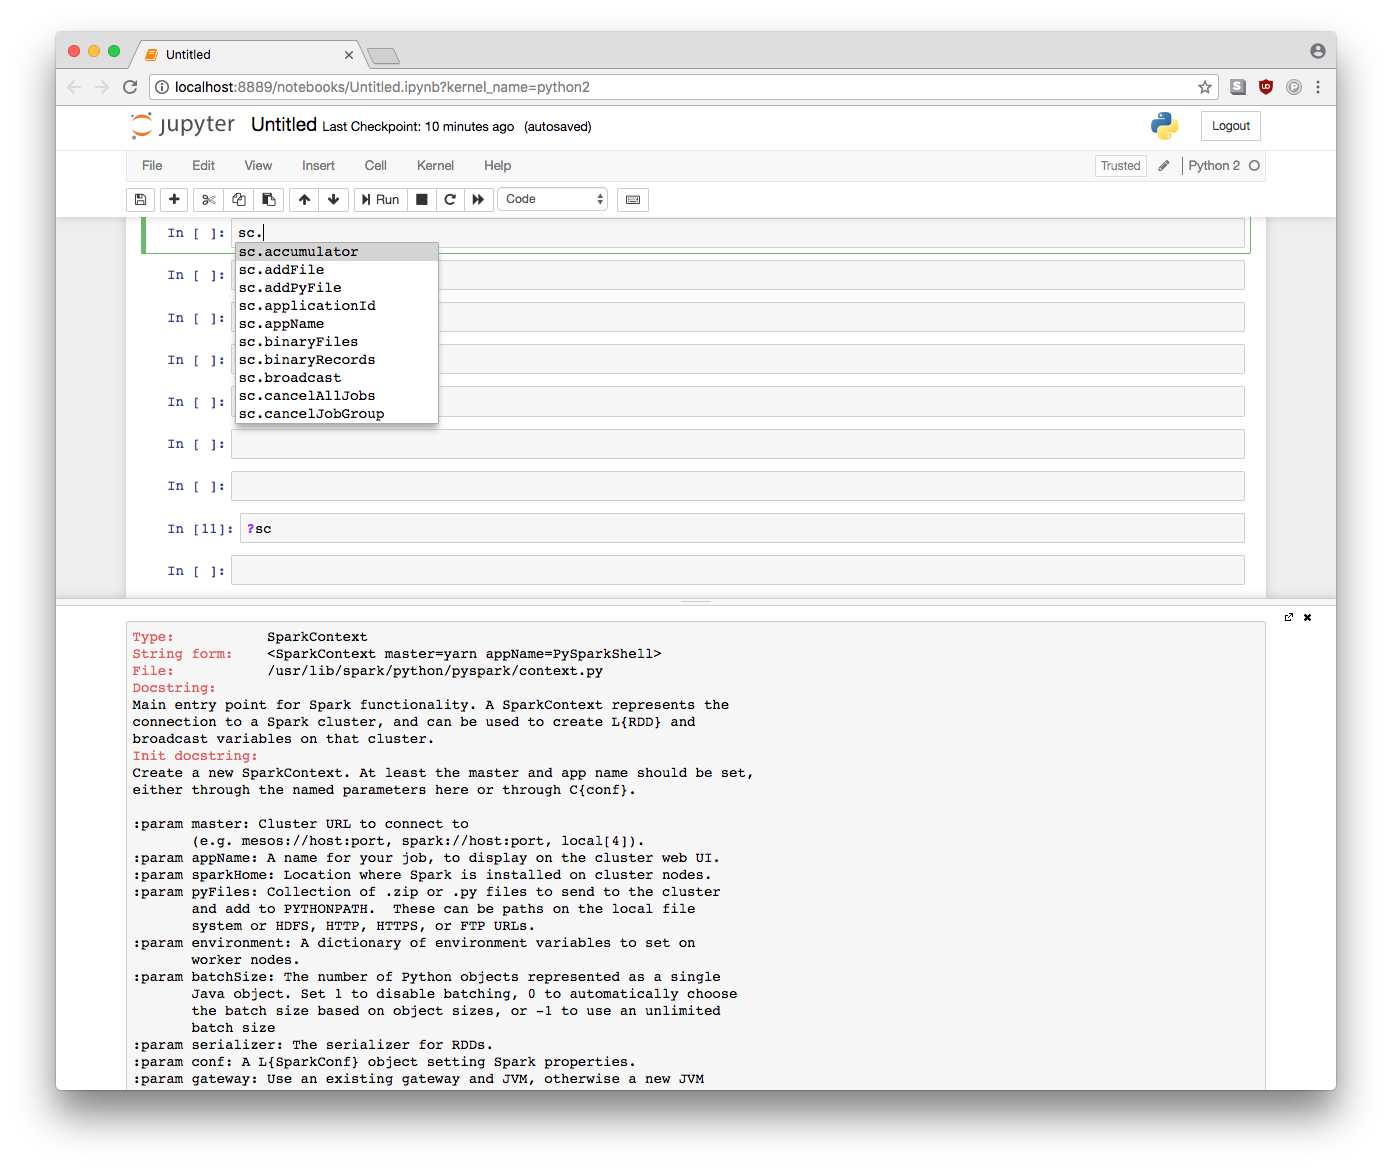
Jupyter notebook comes with all the (default) bells and whistles. You can make and display plots. The dataframes are printed in a pretty table format. Tab-completion works and “?sc” help is available.
Exiting properly
Proper shutdown is important with an AWS EMR cluster.
Shutting down notebooks in browser
- Save your notebook
- Click on
File > Close and halt. This closes your spark session and releases resources (memory and disk space) back. - Once you have closed and halted all notebooks, click on
Quiton the main page of the jupyter notebook. This should gracefully exit thejupyterprocesses running on the master node of the EMR cluster. You should see thejupyterprocess end in yourssh/moshterminal.
If you lose a connection to your jupyter notebook, it does not automatically close out the
jupyter processes. Those processes might still be running and consuming resources.
To close them out, search for the appropriate processes like this.
# On EMR master node
ps aux | grep "jupyter"
If you see jupyter processes running, you can kill them using kill <pid>. You usually
only have to kill one parent process which kills the child processes as well.
CAUTION: Be careful when killing processes. Make sure you don’t accidentally kill someone
else’s jupyter session (which may have the same username hadoop). If you kill someone
else’s jupyter process, they may lose all their work.
Shutting down port forwarding
After you’ve shutdown the jupyter notebook on the master node,
we can shutdown the port forwarding on the local machine. Simply grep and kill the process.
# On local machine

# Find the appropriate process id. You should see your username and the exact string you typed in.
ps aux | grep "ssh"

# Kill
kill <pid>
Downloading jupyter notebooks and data
This step is very important and often overlooked. The notebooks reside on the master node of the EMR cluster. Any data that you saved to disk using the jupyter notebook is also saved on the master node unless you explicitly saved the data somewhere else.
The entire EMR cluster, including the master node, is ephemeral. Leaving the notebook
and data on the master node is extremely risky. It’s possible that you or someone else
accidentally terminates the EMR cluster. Another common scenario is when someone runs a spark
job on the same EMR cluster which results in a failure which, in turn, causes the cluster
to terminate. An even more common scenario is when someone (which could be you) forgets about
a running spark job (perhaps via a zombie jupyter process). While this spark job is running,
various nodes are still holding data (in memory or on disk). If someone decides to downsize
the EMR cluster at this point, EMR tries to put all the data on to the surviving nodes which
can very easily kill the entire cluster if the data is too large.
I highly recommend that you download your notebooks and data or upload them to S3 as soon as you’re done with your work.
To be continued …
This is enough for one post. Stay tuned for another post in which we will actually analyze the data using our newly created Spark cluster.